
| Information | ||
| May 4, 2004, Purchase: |
I bought the car in Winter Park, FL...two owners previously. Car needed alot of cleaning, but once done it's in really good shape. Took it
to Nissan for a going over and they said it's in excellent shape, however, it needed tension rods, tie rod ends, the normal 60,000 mile
maintenance (fuel filter, belts, distributor cap/rotor)...I am going with SPL Racing parts on the front end including the Nismo Power Brace.
The rear passenger 1/4 window has a minor, pinhole leak. Other than that only a few clips and small covers are needed for the interior. It
came with an Injen Intake and Accel Thundersport 300 wires. |
| August 10, 2004: | I ordered a bunch of the interior and maintenace parts I needed from a place called Nissan Auto Parts Dealer. Their prices are rock bottom and only 6% to ship. So often online parts houses have additional handling and shipping charges that make just buying parts at retail locally a better deal. This place has the Nissan Parts catalog online so you can usually see the part you need as well as other parts that may be needed. They also carry most of the Nismo parts at decent prices. Jay is the only guy their that handles internet orders. Their online email system does work if you give Jay a day or two to hunt down the parts you need. The main problem he probably has is the customer not giving enough information...so be descriptive. My local dealer I would love to give business to, but when they want $65.00 for the same part I can have shipped to me for $48 it's a no-brainer. |
| August 14, 2004: | I picked up a Nismo Power Brace, Upgraded Z32 inner tie rods and Kazama adjustable outers, SPL adjustable tension rods (V.1), and
rack boots from SPL Parts. An absolutely top-notch outfit, especially customer service. They will really take care of you! Plus their prices and knowledge are outstanding. Kuah and Adam both really know Nissans. They don't sell everything though, although they *could*, they choose to only sell what they know works. About the job: [Note: all jobs here are described from the 'problems' you may encounter, hints, and recommendations....you should use a shop manual for the exact steps/specs!] First you have to jack up the car, removing the wheels would make the outer tie rods an easier job (at the time I found out my car had wheel locks and I never received a lock key). Also when you reinstall your wheels torque them to 72-87 ft-lb., don't use an impact wrench. Once it's up on stands, remove the under radiator cover. You can then remove the OEM tension rods and braces. The Nismo Power Brace and SPL adj. tension rods just bolt right on. The Power Brace bolts (2 in front and one in rear each side) torque to 80-94 ft-lb...the tension rods get that also for the front and the two bolts to the lower control arm get 69-83 ft-lb. Match up the length of the tension rods with your stock ones. The outer tie rods are basic, torque is 22-36 ft-lb to the spindle, 58-72 ft-lb for the nut that backs against the outer tie rod, and the same for the inner tie rod to rack + locking sealant on the inner tie rod to rack (although I skipped this, as the Nissan techs told me they don't use it many times). The inner would be a lot easier with two thin wrenches (I am not sure the size, 22mm maybe), I used a couple adjustable cresent wrenchs and it was really tight. Again match up your new tie rods to the stock rods so you can at least limp to the alignment shop. I skipped using the factory wire wrap on the rack boots and just used a set of heavy zip ties. Much cleaner looking. I went over the lube points with marine lithium. I have some Redline chassis grease coming, I heard it's the best stuff to use. *update* I am using the Redline CV-2 stuff now, clean out any old grease before adding any new stuff...definitely harder to wash off...still stinks though....they need to make a better smelling chassis grease....same with gear oil :). |
| October 30, 2004: | Finished up *some* of the maintenance I needed to get done. Installed some BKR5E-11 / 6953 NGK V-Powers and trashed
the stock NGK platinums ....they work well for long life, but they aren't the best in terms of performance. Easy job on the 240SX SE, shop
manual calls for 18-24 ft-lb. I did the cap and rotor also, easy job. The rotor pops off (there are 'finger indents' on the side), the shop manual doesn't explain this basic process. The new cap comes with new bolts from Nissan, mine were corroded badly. Next were the A/C, Alternator, and Power Steering belts, I used Goodyear Gatorback Poly-V's the part numbers are: Power Steering (4030390 / 3PK0990) Alternator (4040305 / 4PK0775) A/C (4040335 / 4PK0990) ...the power steering one was the hardest because the unit did not want to pivot once I had loosened it. I loosened the adjustment bolt clearing about 1" of threads at a time and smacked it straight with a hammer (not a good thing to do most times, but with a few firm taps I could replace the belt) [Note: the right way to do this is to loosen the bolt that you can get to from the pullies' access hole on the left side (passenger) once you rotate it around...this is not documented in the manual, the second time I did this for my crankshaft seal it was so much easier]. I sort of hate doing non-serpentine belts....the shop manuals call for 'amounts of deflection with X weight', for the 240SX this is 22lbs and 1/4 a little less than 1/3"...1/2" or more = too loose / replace if worn. Torque is 16-19 ft-lb on the locking bolts for the PS/Alt and 24-28 ft-lb for the idler pulley on the A/C. Last job I gave up on to do fresh...the PCV Valve. This is located under the Intake manifold. You will have to remove the air intake, and then decide basically if you want to remove the upper radiator hose or the alternator. Once I do it (I am going to go the radiator hose method since I will be flushing my coolant at that time too), I will post a better way if there is one. It's about a 1-2 hour job though, most cars it's a 5 second deal. There is a write up at: http://www.240sx.org/faq/articles/pcv.htm Repainted my windshield wiper arms Rustoleum Satin Black. Skipped the primer and just sanded them up with 600 grit lightly, rinsed in lacquer thinner and hung them on a wire to paint with a few coats...keep them light each time or you will get runs. To get them off the car you have to pop off the plastic caps with a small screwdriver (there is a slot in the cap for this). Pry evenly or you will cut into the cap. Looked at the rear differential to prepare for my VLSD later. No special tools really needed, but you will need a 14mm crowsfoot if you want to torque the propeller shaft's 4 nuts as you cannot get a box wrench nor socket on them. The axle nuts look 14mm too and are easy to get too...the other 4 bolts look simple as well. I tried to remove one of the propeller shaft nuts and I couldn't break it loose....the bolts are not corroded at all either. I didn't try extremely hard, but I will be hitting them with WD-40 until I do this job. *edit* the following week it takes a lot of force to separate them, then they basically just finger spin off...there are a lot of bolts like this I found. |
| November 6, 2004 | Installation: Rear KTS SC β Coilovers Whiteline rear sway bar non-abs JDM VLSD Cusco Type-40 Rear Strut Bar Partial front spindle change First things I did were to adjust and setup all my components. I preloaded the front coilovers at 80kg (1cm of preload)...this preserves the suspension travel. Basically you use up some of the car's natural tendancy to 'dip', you are taking out the initial tendancy for the car to travel on any bump. You don't want to use it all as then it would be rock hard (linear springs are not changed as far as spring rate goes, I am still at a 8kg/mm rate), but you want to take off the initial 1/4 or so of it....more than I need to go into here, but search coilover preload on google or another engine and find out the details.....then I adjusted all the coilovers to the same ride height in relation to each other. I made sure all parts were present in the other packages, and anything I'd need I'd have on hand (tools, materials, etc). At this point you want to get a base ride hieght at all four corners (due to tires possibly being a factor on different heights). I ended up with roughly 27.125" up front and 26" in the rear on stock tires and components (on my new wheels and tires ride height was 27.625" in the front and 26.5" rear), you can almost stick your head into the wheel gap ;) j/k. There was only one problem with this part, one of my KTS SC β front struts had the upper spanners extremely torqued down, enough where I had to actually step on the spanner wrenches to loosen them...it marred the edge of one of the nuts. I weigh 186 lbs. right now and it was tough...fortunately they did separate and were not seized or screwed up. Onward to the rear first, specifically the VLSD: There is an excellent writeup at: http://importnut.net/lsdswap.htm Since I was going to be replacing the rear swaybar at the same time it made sense and an easier job to just undo the rear sway and remove it completely. There is a slot in the D-brackets for the sway bar, you want to leave the bolts on the slot side in to make it easier to put them back on....either way though it's an extremely simple job...it's just easier to not have to try and attach both a bolt and bracket at the same time. To do the rear sway bar, you will need to remove the two nuts that hold the rear muffler flange to intermediate pipe...I did not need a new gasket/donut. It also makes the VLSD install easier I think. You should also remove the single bolt for the exhaust hanger by the differential....this will allow the exhaust to drop a bit and give you room. I started with the propeller shaft bolts (4 of them), you will need box wrenches as sockets won't fit here. Use the emergency brake to hold it still as you loosen each bolt. The axles you can use two wrenches (I believe they were 14mm)...use the emergency brake to keep things held while you are working them 2 at a time (on the 2 x 3 axles...for 1 x 5 axles you probably want to work 1 bolt at a time)...once the axles are undone, get a jack under the diff. Now undo the front two bolts, and then the rear two nuts....(mine had a third nut to hold a ground strap). The rear nuts you may need a universal once it's a little loose...it's tight, a very slim rachet may work though, my craftsman standard quick release rachet and short-height socket didn't come close to fitting after 1 full turn loose. Once that is done work the diff forward and down...the axles are best released one at a time. Slide the diff as far left or right as you can and compress the opposite sides axle and push it up. Slide the diff the other way and repeat, then continue it down and out from under the car. Most differentials are shipped without fluid and also without a good gasket if any...you will want to remove the rear cover and clean it up ...it wouldn't hurt to wipe out the bottom of the diff as well to remove junk that may have gotten in it. Many swear by RTV Silicon to seal diffs, I got a Fel-Pro gasket (RDS27275)...tighten the rear cover to 29-36 ft-lb., make the differential level and fill until oil starts to come out the filler. I used Redline 75W90 gear oil. Do this where spills will not ruin anything, gear oil and used gear oil is nasty stuff. Both differental cover 'plugs' get 29-43 ft-lbs. I used some teflon tape also. Installing the new diff is just reversing the steps, hardest part is getting the axle cones back in :). To torque the propeller shaft (I didn't) you need to use a crowfoot. Making the axles and propeller shaft tight I think is sufficient...but on the rear diff nuts you want to torque to 72-87ft-lb and no more...you can break the cover and that's a common problem in this install. The lower bolts don't have a torque spec listed...they are on bushings though so that's probably why...you obviously want them tight, but not so tight that the bushings are deformed. Now slide in the rear sway, grease the bushings and replace, and reattach it unless you are replacing the shocks and/or springs, if so wait until after as to not have you redoing the work. Bolt up the exhaust hanger and muffler flange, and you are done. If you are doing springs and/or shocks, you shouldn't attach the endlinks until both sides of the struts/springs are in. Since I was doing springs and struts/shocks, KTS SC β, I did them first, easy install as well. You first want to loosen the lower shock bolt, and tap off the shock from the peg since it will be under a little tension from the weight. Be careful as the suspension will fall down once it's off the peg...you can put a jackstand under it if you want. Then unbolt the top two nuts in the interior (you have to remove the rear speaker carpet cover that is held on by about a half dozen plastic clips). Then lower the old shock down and new one up. If you are adding a strut bar, make sure that the brackets are in place (I used the beefy Cusco Type 40 under tray style)...re-attach the lower bolt (the larger flare on the shock goes toward the bolt head)...don't replace the carpet yet as you will want to set dampening once you test drive. Torque specs are 12-14 ft-lb. for the upper 2 strut bolts to the body, and 72-87 ft-lb. for the lower bolt. On the shock the larger flared side of the bottom mount is on the spindle end. Then the whiteline sway, for the rear you want to check out this ok article on it: http://www.zilvia.net/installs/swaybarrear/doc.asp The endlinks (which no instructions are provided) are (from the top down first): nylock nut, cup washer (cup down), urethane bushing (nipple down), your control arm, urethane bushing (nipple up), cup washer (cup up), two nuts. From outside to inside: bolt, small washer, endlink, larger washer, swaybar, nylock nut (I used another washer on the nut side of the sway). The holes at the end are for a looser setup and the holes closer to the rest of the bar are for stiffer setups). Torque specs here are 1 full turn past touching the bushing. I did a little more as the bushings were not compressed and it was still loose in my opinion. Just don't crush the bushings. That's that. I wanted to complete the front the same day and easily could have if my one ball joint boot up front didn't get torn doing the spindle swap (a common problem)...to be continued next week :), I usually use http://www.nissan-auto-parts-dealer.com, but apparently Jay the only internet parts guy is no longer there ... I needed parts and I was calling back every 30mins to see if the 'guy doing this now' was in....I gave up...http://www.nissanpartscheap.com and Philippe there (sp?) got me my two front lower control arms and the spindle nut at almost $100 less than both my local Nissan dealers *after* two day fedex was figured in...my local shops are raping people. Oh well. |
| November 12, 2004: |
Continuation of last week's 'episode' ;). I was hoping it would be without incident, but alas... Today I did both front lower control arms, the passenger spindle, the Okuymama / Carbing front strut bar, the KTS SC β Front Coilovers, the Whiteline front sway bar and adjusted my ride height. First I began by disassembling the front end...since I was replacing both the spindle and lower arm on the passenger side I didn't bother trying to remove the ball joint...if you want to save the brake splash shield you would but, I was scrapping those at this time. Basically, the caliper comes off, the spindle nut, the tie rod end, the tension rod, the sway bar, the ball joint, and the strut. Once everything was off, I bolted back in the lower arms and the spindle...torque specs here are 80-94 ft-lb. for the lower control arm to body bolt, 71-88 ft-lb. for the balljoint nut, 22-36 ft-lb. for the tie rod to spindle. Nothing special about it. I then placed the front strut bar in place and bolt the struts upper nuts to 20-24 ft-lb., the manual calls for 29-40 ft-lb and I will be calling about that difference...there was a slight interferance with some part of the vacuum/emissions controls which mounted to the passenger strut tower, but the bar seated down...just a little marring on the edge where the bolt for whatever the control was cut into the soft aluminum. My solution will be to take my trusty dremel, a cutting stone (barrel-shaped) and make a little recess for a socket to fit on this control's bolt head. I imagine this is because Japanese parts are for Silvia's, not 240SX's... Moving along...I then mounted the strut to the spindle @ 90-112 ft-lbs, attached the tension rods (see above for torque), attached the tie rods (see above for torque), and at this point replaced the rotor and torqued down the new spindle lock nuts @ 152-210 ft-lb. and then crimped them in place. Contrary to the factory service manual, the lock washer is not a 1998 part....the lock nut replaces that need. You can tell if your spindle has slots on the base or is totally round...if round you need a lock nut only. I am not sure about the slotted set-ups. Replacing the dust cover/hub caps was tricky...if you have a 70mm outer diameter-59mm inner diameter pipe/device you will have what I believe is a replacement for the factory tool...I just tapped them in place working around the edge slowly....it popped out several times trying to make it go down evenly, but eventually that was done. On to the sway bar next...this part had problems....Whiteline supplied one nut for the 12mmx1.75 thread bolt that was not the right thread pitch...on top of that the bolt itself was marred in the package so I was not sure if I screwed the nut up with the bolt or not...I finally realized both threads did not match....I got a replacement nylock nut at Lowe's....fortunately I had another vehicle where I was installing. This snag cost a little over one hour of install time though, almost two, but back to the install... First mount the bar to the body with the factory 'D' brackets and whiteline's bushings (once you have lubed them). For the the front end links: the L shaped bracket goes through the old end link hole. The L part is inside, so the upright portion of the 'L' is closest to the engine bay. The bracket mounts with the largest washer and then the nylock nut that fits it. The longer of the two bolts and small washer goes to the inside through the sway bar and then the top of the endlink. The holes closest to the front of the car (back of the bar) are the stiffest settings. The smaller bolt and small washer goes to the inside of the bracket (on the engine bay side, then through the endlink. Take the other two washers and nylock nuts and attach them....remember to grease all bushings. The 'torque' specs here are once you touch the bushings add 1 full turn...I did more than that, but it did not distort the bushings at the tightness I did. At this point your front end should be done. Now the fun part of getting the ride height right. It's just a matter of adjusting the lower strut mounts and shock mounts....if you didn't preload, you can just loosen the lower spanner nuts and twist the strut up and down. In the front I have 80kg preload, which lowered the car 1cm, I had to unbolt the strut at the bottom as with the preload I couldn't turn it. I lowered the lower strut mount until only 2 threads at the bottom were left, tightened it back up and reattached the strut...I ended up close to my desired ride height of 26" with a final 26.125"...my tire size is 7/16" taller than stock, with a stock height tire I would have liked to be right at 25.75". The 240SX has a limited suspension travel...even 1" of lowering makes some compromises without preload. The rear was easier...just jack up the car, loosen the lower spanner nut and twist up and down....I ended up on target with 26" in the rear, a slight difference between front and rear as far as total lowering seems proper....I am at about 1.5" in front lower and 0.5" in the rear...looks like a good height, nice and flat with plenty of suspension travel, the numbers seem like not as much on paper as it looks, but I did go with a overall tire height 1/2" taller than stock. I set my dampeners at 8 out of 15 (starting at the softest) and the ride home and the next day even on a terrible alignment now was surprisingly compliant, even looking for road problems. Big bumps and pot holes (I didn't hit large ones) are noticable....they were with my stock set up too....however, now instead of dipping way down and then way back up, the suspension dips slightly and recovers to ride height...that is the extent of it. You do feel this as a quick stop on both the rebound and compression, where the stock setup sort of oscillated a bit. It's better for me and not harsh at all. The suspension is also quiet. No noises I could notice from the struts, sways, springs, etc. I am very happy with them so far. Once I am aligned I will write more. I found the following S14 alignment specs recommended from whiteline with a kit they sell: Touring: Front: Camber: -1.5 deg Caster: L+7.5/R+7.0 deg Toe: 0.0mm Rear: Camber: -1.0 deg Caster: n/a Toe: 1mm in Sport: Front: Camber: -2.0 deg Caster: L+7.5/R+7.0 deg Toe: 0.0mm Rear: Camber: -1.25 deg Caster: n/a Toe: 0.5mm in Factory: Front: Camber: -1.50 to 0.0 deg (-0.75 deg nominal) Caster: 6.00 - 7.50 deg (6.75 deg nominal) Toe: 1.5 - 3.5 mm in, (2.5 mm in nominal) Rear: Camber: -1.67 to -0.67 deg (-1.17 deg nominal) Caster: not adjustable Toe: 0.0 - 5.0 mm in, (2.5 mm in nominal) Doing this job I saw the chassis flex, right at the cowl/windshield to engine bay...I want to give SPLPart's front fender braces a try definitely...just don't want to deal with fender pulling now and the paint touching up required. |
| November 15, 2004: |
I went with this alignment recommendation: Front: Camber: -2.0 deg Caster: L+7.5/R+7.0 deg Toe: 0.0mm Rear: Camber: -1.25 deg Caster: n/a Toe: 0.5mm in They said it fell a little less in the rear on the camber mark. In my now 'real' test drives, there was quite a bit of bouncing....I bumped up the struts to 12 out of 15 (was at 8) and the rears to 10 out of 15 (was at 8)...ride I think can still be improved a bit, but I will say it's very confident. I went into a bumpy on-ramp today and I was leaning more than my car...definitely have to learn to drive this all over, in the past 6 months I have learned what my car couldn't do, now I have to learn what it can. Since the alignment my front tires are fitting without incident so far. All four corners have Yokohama AVS ES100 235/45R17...the proper stock tire size would have been a 245/40R17, but I wanted a little more sidewall 'cushion' (my wheel is about 0.4" taller than stock). on a 1998 Mustang Cobra (Ford part number M1007D178) 17x8 +31.5mm/5.72" backspacing wheel)...however, I can't fit a finger between the tire top and strut nut so this weekend I am going to check it out. (edit: there is plenty of clearance.) The wheels are about 21-22lbs each, not an ultra-light, but at only a little over $100 each new ( at GEFRacing.com), I am not complaining. If I wanted to race all the time I would probably shoot for a 12-14lb wheel and probably also go with a shorter tire for acceleration. Car handles great though....braking is flat, acceleration is flat, cornering is flat....I had backed the front struts down and it became harsh at the 4 (soft) out of 15 (hardest) setting I choose (setting at 8 was bouncy [edit 12/13/2004, 7 front and 4 rear is more or less a better 'street' setting now that everything is broken in a bit...the ride changed alot with 500 miles on it] )...it feels like I am just sailing down the street now, but at the same time can feel what I need to. There was a railroad crossing with a big dip that used to bounce me all over the place...I took it today at speed and with just a slight kick to my rear nailed it, much better that a land yacht. I am not saying KTS SC β's are the best, as I have no experience with the upper echelon, however; I am sure they are one of the top in the $1000 to $1,500, maybe $2,000 category. Big thumbs up to SPL Parts for making these available easily stateside. |
| November 23, 2004 | I adjusted the struts originally a little stiffer because I had some bounciness/shimmy, but that now went away and I
lowered the settings to 5 front / 4 rear (15 being stiffest). Ride is GREATLY improved...very stock feeling as far as taking bumps, but very
unlike a stock 240SX where it bounces up and down after taking the bump. I do give up a little in the smoothest of turns I bet, but you
really can't drive like that all the time. In rough corners I now stick to the road instead of hopping over it. |
| November 26, 2004 | I did the Crankshaft seal that I should have done when I did the 3 accessory belts...job was easy, although those
that say they can take off the crank pulley without a puller, have got to have problems with their crankshaft or pulley. Also the pulley is
a harmonic balancer, at least mine was, there was some talk about underdrive pulleys I had read and that 240SX's don't have harmonic
balancers anyway. First thing you want to do is jack the car up and remove the lower fan shroud (it unsnaps in three places). Then remove the fan, then the air intake, then remove all belts (if using the Factory Service manual, you will want to loosen the P/S pump's left-side (passenger) bolt. It is not specified in the manual, but needs to be loosened (not removed) to allow the P/S pump to pivot. Now you can pull the pulley once you break the bolt loose. To do this place the emergency brake on (it should be already if you have jacked the car) and place the car in 5th gear. This will allow the most advantage of the drivetrain against the turning of the crank...FWD cars are a bitch in this aspect... Once the bolt is broken loose, loosen it up about an 1/2" or so...then attach the pulley puller and pull it off. First thing you probably should do is clean up the oily mess a seal failure has caused. I used Simple Green (5 to 1 mix) and a old rag and brush...oil gets as high as the alternator and A/C compressor...and low enough to coat the oil pan and crossmember. Once this is done, you can remove the old seal. To remove the old seal you want to first look at the new one to get an idea how it sits. Then take a pick, screwdriver, hook, whatever to remove it. I used an that was 3/4 circle...it allowed me to place the point near the block and then pry down...the point would then never score the block. The seal looks like this: >|, the ">" part goes toward the engine and the "|" part to the pulley side. If you look at the old seal before you pull it, it's totally clear how it goes. Tap the new seal in, a HUGE socket may work best, but I used a flat piece of wood (a broken paint stirrer from Home Depot) and a hammer. Make sure it is flush...if it protrudes and/or if the crank pulley rides on it, it will fail quickly. Clean everything up and reassemble...the crank pulley torques to 105-112 ft-lb. The fan nuts were not specified...make them tight, but not excessively so. The rest is mentioned above in my belt replacement. |
| December 03, 2004 | I raised the settings to 8 front / 6 rear (15 being stiffest). Ride at 5/4 was a little soft at times, I have been
starting to push it more. Higher spring rates have their benefits of just blasting over things that would usually cause your car to bottom
out :). |
| December 08, 2004 | I dropped the settings to 7 front / 5 rear (15 being stiffest). It's almost there, :). |
| December 13, 2004 | I dropped the settings to 7 front / 4 rear (15 being stiffest). perfect I think. ;). Seems a lot of difference
between 4 and 5 in the back....5 was causing my rear to 'hop' over larger bumps. I bought the 8/6 spring rates with superior dampening
to be able to power through crappy road sections and not worry about crashing down. |
| December 31, 2004 | I dropped the settings to 6 front and kept 4 rear (15 being stiffest). It's a little better now. Seems a lot of
difference between 7 and 6 in the front....7 was causing a little harshness on crappy roads. |
| January 7, 2005 | I raised the rear up a notch to 5 and still 6 front (15 being stiffest). I may bring the front down
to 5 and see how that is...at 4 in the rear on large bumps the springs would get away from the dampners...5 is holding them down, but on the
smallish bumps like rough roads you notice that more. What I am looking for is a real crappy road and I will try that and a real smooth road
to try right after and then figure out what compromise I want. |
| February 5, 2005 | I lowered the rear to 3 and the front to 5 (15 being stiffest). Some of the roads I was using to test make other
cars 'bounce' so they messed up how I was testing before. The ride is comfortable and still controlled, if I was going to be driving
hard I'd probably go to 7 front and 5 rear or so. I am going to try and drive around to different types of roads and see how this is. |
| April 25, 2005 | I lowered the rear to 1 and the front to 2 (15 being stiffest). This may be a little soft for most, especially
if on smooth roads. My commute covers mostly one road that is just pretty bad. Now with this setup I can still blast over parts that
have other drivers slamming their brakes and pulling into another lane. It's very comfortable. |
| April 30, 2005 | My valve cover was leaking a bit for a while, finally really opened up. Used a FEL-Pro gasket and some copper RTV to
fix it. If just replaceing the gasket it's a simple fix, you have 11 bolts on the valve cover, two on the wire looms, and two grounds. I
chose to paint mine with Krylon Red Wrinkle Finish. First step was wire brushing it all, then I rough sanded it (about 400 grit), then I
polished the lettering. I masked off the oil cap area, the spark plug holes, and the two middle screws. I painted it and then immediately removed the masking after about 5-6 coats (a good wrinkling), then waited about 2 hours. I then took several sharp razor scrapers and got the paint off the lettering, following with a thin thin rag damp with lacquer thinner. The results are above. Looks way better than plain metal! |
| August 13, 2005 | Installed Greg Dupree's subframe spacers. I did this job in about 30 mins total counting getting my tools out. It's about as simple as it gets, you don't have to press out the old bushings at all. Just bolt the 'caps' on them, pop in one of Greg's pieces and torque it back down. You will notice some more noise and vibration, but it's not as harsh as going with urethane or aluminum bushings as your stock rubber units are still dampening some of it. I thought I would mention it, but I don't notice it anymore. This modification will also solve 'clunking' sounds coming from your rear subframe as the bushings deteriorate. I installed them for this reason, but it turned out my 'clunk' was my whiteline sway bar. |
| January 28, 2006 | Replaced worn out Yokohama AVS ES100's (235/45WR17) with Goodyear Eagle F1 GS-D3 (235/40YR17). The Goodyear so far (3000 miles, 6/12/06) have rode much better, are quieter, and have much better wet and dry handling. The AVS at about 5k miles began howling, I originally thought my bearings were going bad...the tires were almost completely bald by 9800 miles with regular rotations. (about 3 times during their life). I picked up the Goodyears on sale for a killer price at TireRack.com. These tires were a night and day difference from the AVS. |
| May 27, 2006 | Replaced my stock brakes with R33 GTS-T front calipers (30mm x 296mm rotors) and rear Z32/R32 calipers (18mm x 297mm rotors).
I used SPL Parts S/S lines, ATE Super Blue Fluid, Hawk HPS Pads, R33 GTS-T rear e-brake cables, stock Z32 backing plates/e-brakes and a 1 1/16
(17/16") master cylinder. I picked up a complete brake set from ebay, it was supposed to be the 32mm x 296mm R32 GTR set...however the guy sent R33 GTS-T brakes. The front rotors were fine, however; they were not clean like the auction stated and had to be turned. The rears that were included were beyond serviceable limits and one was chipped in shipment (which also chipped one rear caliper, significantly but repairable with JB Weld and invisible after powder-coating). About $20 in nuts and washers were missing, but the e-brake pads were good (these are $140 to replace). Everything was just thrown in a big box (120lbs with a single wrap of 1/8" foam and about 1 foot of empty space in the box), when it arrived the driver recommended I didn't sign for it. I was able to get a set of rear Brembo rotors for about $100 shipped online, new. The next event was getting to front left calipers in the box that took about two months to get right. I was a nightmare...during this whole time which played out over 4-5 months my current rear passenger side brake was down to nothing and throwing rust all over the car. I was going to replace the pads, but kept getting promises from each of the vendors that the right caliper, the R33 e-brake cables, the rear caliper seal kit, etc would be at my door within a couple days. Days turned into months....two of the vendors ended up not being able to get the parts at all, luckily I was able to get them from Japan. I was a nightmare. I had to rebuild the calipers, which was an easy job. The hardest part was cleaning them up and then having someone 'blow out' the brake pistons. Two shops couldn't do it right...finally I took it to a machine shop and they popped them out and cleaned the insides well. I then took the calipers to be powder-coated. They looked great once done, I sanded off the powder-coating from the 'NISSAN' letters and they looked perfect. With the powder-coating done I rebuilt the calipers. This is an easy task, however; the rear caliper kits will run you about $90 in the US as Nissan is not importing them anymore (they are about $35 MSRP). The Nissan 'kits' are nice as they come with the proper grease, all the seals, rings, dust boots and even the bleeder valve covers. I also picked up new pins, cross springs and pin clips. The shims were fine. Everything went pretty much together like the write-ups online. I found out the R33 GTS-T ebrake cables are a perfect fit. If you remove the stock brackets off the factory e-brake cables and then replace the one's on the R33 set with them in the same spot, they bolt just like factory. I removed the 2 brackets from the R33 GTS-T cables and discarded them (they just pry off). Braking is greatly improved in feel...I haven't tested actually stopping distances, but they feel more confident. Also they look a hell of a lot better than the tiny S14 brakes in the front. I didn't have luck with Russell Speed Bleeders in the front calipers, no matter how tight they were, fluid still would drip out. The OEM were fine. |
| October 24, 2006 | Replaced transmission fluid at 90,729 miles with Redline MT-90. Picked up the fluid from myoilshop.com and
had Palm Beach Performance put it in. I wasn't having any problems with my shifting so I didn't really notice a difference
afterwards. I am sure if I was on a track or in colder climates it would be night and day, but this was just a maintenance item. If you are in West Palm Beach, this
shop is affliated with United Auto and Palm Nissan. They are going to become the 'factory' performance place for all United Auto's makes. Their staff is great as they all own Nissans...mostly Z cars, but the Z32 is close enough to be a 240SX for most of the important stuff. They do everything. Soon they will have a dyno and be moving to a larger facility. I was waiting for service at Palm Nissan when they saw my car and asked if I would mind taking it over to their shop. Once they explained what they do, I had no problem doing that. Palm Nissan is a great place too, but my car is nothing like a stocker. |
| November 5, 2006 | I did a couple things today...changed my ride height and put the proper hardware on my rear axles. My ride height from the ground to the middle of the wheel wheels was 26.125" in the front and 26" in the rear on 235/45's. When I changed my tire size to 235/40, my ride height went down about 1/2" as the overall tire height is about 1" shorter, but it increased the wheel gap a bit. Looked like stock again *almost* :). I didn't measure it, but my ride height should have been around 25.625" in the front and 25.5" in the rear on the new tires. I lowered it based on 1" at the top of the strut base to the spanner nut. I ended up with 24.5" in front (1.125" lower from my previous and 2.225" lower than stock) and 24.625 in the rear (0.875" lower from my previous and 1.475" from stock ). My camber was greatly increased in the rear it seems (more negative)...I am hoping to not have to do RUCAs and Toe Arms, but I may have to bite that bullet. The rear axle hardware was easy this time...I don't know why they were taken off originally, but it was almost impossible to break them loose when I did my Skyline brake conversion...this time it was easy with a breaker bar and some pipe. I had the big metal washer, the 35mm nut, the rubber castle nut washer, the castle nut and the proper cotter pin on each side ordered from Nissan. Even with a discount online these added up to $40. The one axle's threads were a little messed up from the previous owner peening over the nut...it went together fine though and now it's the right setup. |
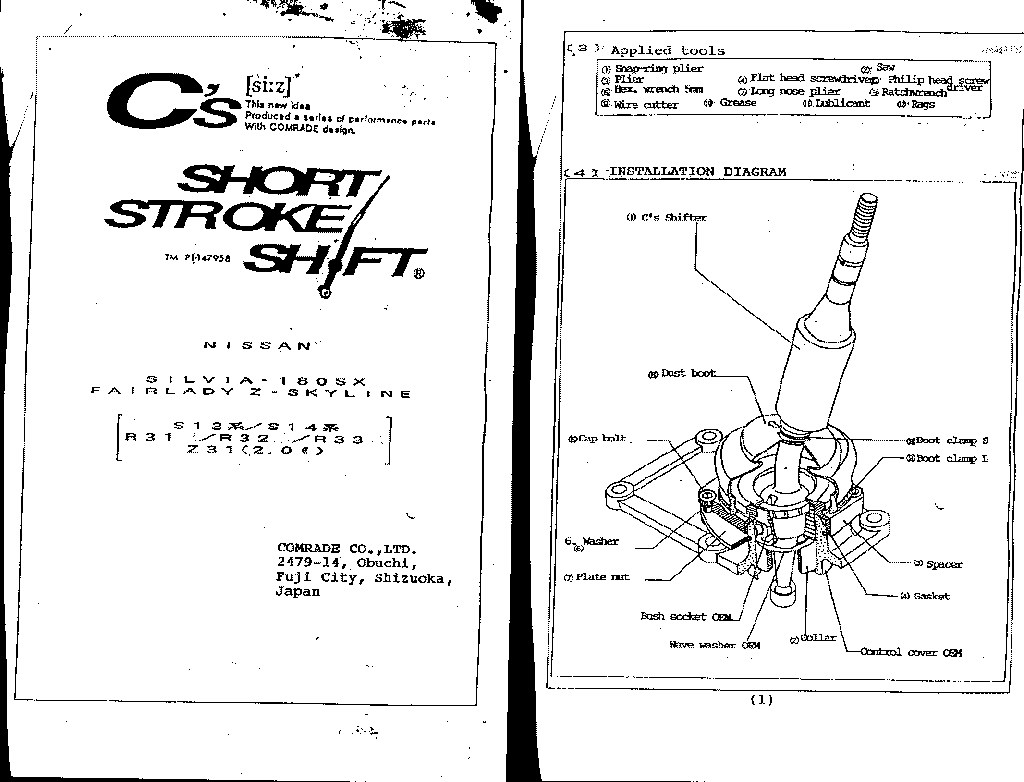
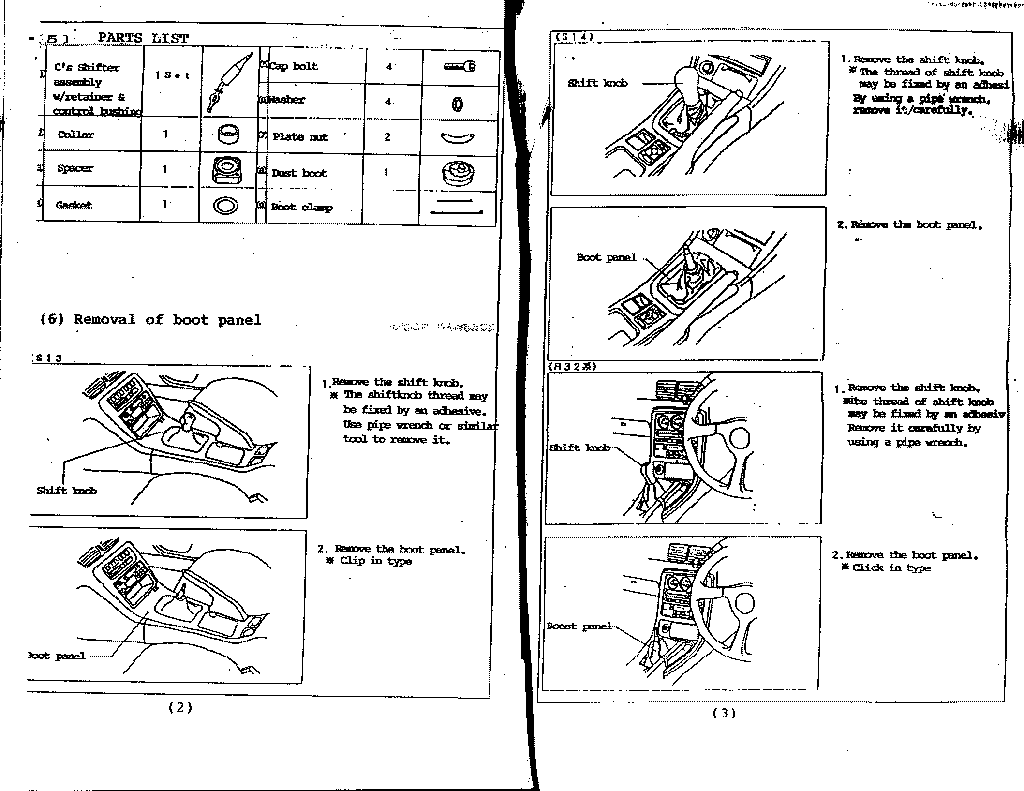
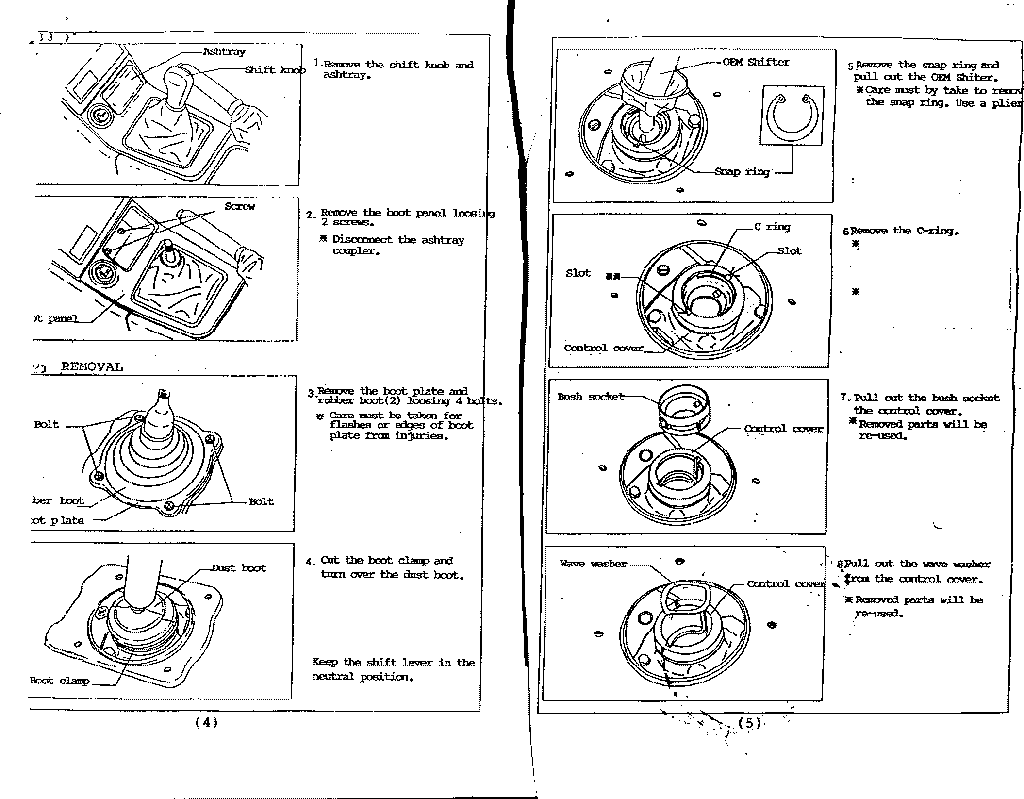
| November 18, 2006 | C's Short Shifter I bought this used in like new conditions from jdm_jdm_parts on ebay. Price was about the same as another stateside that had them brand-new, but they had let me down on two other JDM purchases that took 2+ months before I purchased them elsewhere. I did a buy-it-now late Friday night, before the next weekend they arrived from Hong Kong. That's fast! I love the shorter shifts and no noise. I don't know how the B&M can be shorter or how the 'clicks' matter as mine 'clicks' into gears. I avoided the B&M for the more intensive install. You can avoid the B&M rattle with some dremel magic on the base plate. Installation was simple. Download these pages: Page 1 Page 2 Page 3 Page 4 Page 5 You can also download more info on the Pilot C's shifter clone here [The picture they are using is not what the shifter looks like]. Basic summary on my S14: Tools/Supplies: 10mm socket and ratchet with a 6" extension or a large phillips screwdriver for the dust cover bolts. A couple small flat screwdrivers or picks to remove the snap ring. Snap ring pliers or needlenose pliers for the C-ring (I used small needlenose pliers, Craftsman 8" to be exact). Small diagonal cutters for the zip-ties. 1 zip-tie for the top of the lower boot, small...medium sized zip tie. 1 zip-tie for the bottom of the lower boot, 11" maybe 10" at least...could have been a little thinner to fit in the groove on the C's shifter spacer. Regular pliers to remove the snap ring. White lithium grease for bush socket. 6mm allen key for the C's cap bolts. Some degreaser like Simple Green and shop rags. First if you want to change your transmission fluid now is the best time. Remove the drain and let it come out (car should be level). Replace drain and when you get to the point where you remove the old shifter assembly, remove the fill plug from below...then pour in fluid from the top (being very careful of your interior, I had mine serviced using a pump). Once the fluid comes out the fill plug...let it sit until no more comes out then replace the fill plug...continue installing the shifter. Remove knob [save]. Remove shifter boot and trim [save]. Remove 4 bolts that hold the outer dust cover [save]. Remove dust cover metal trim [save]. Remove upper rubber boot [save]. Remove lower rubber cover [save, not mentioned in the instructions]. I then cleaned up the top on my transmission as my old lower boot's zip tie came off at the bottom and loosened at the top...some trans fluid can gotten out. This explains the 'oil smell' I had after driving hard sometimes. I used Simple Green on a rag and just wiped it down. Cut zip ties on the lower rubber boot [discard ties and boot]. Remove the C-Ring and snap ring [discard, removing the snap ring is the hardest part of the whole install, I pryed from the shifter notch and the front of the snap ring with two screwdrivers, once it was raised I grabbed the end with a regular pair of pliers and pulled it out]. Remove bush socket (the plastic piece with metal pegs that slide into the shifter body) and wave washer [save]. Put in the round metal collar from the C's kit [make sure nothing is rough in the shaft first, mine was smooth]. Put the wave washer on top of it and then the bush socket (which I put some white lithium grease on the inner parts) and topped with the C's paper gasket around it. You want to make sure the bush socket sort of springs up and down and is not bound. If it is your plate nuts won't line up. I changed the way I followed the instructions next a bit. I mounted the C's plate nuts with one cap bolt [I bought my own 6mm x 1.0 cap bolts from the hardware store...I could not find washers to fit though, I used 16mm in length...12mm may have worked] to each of the C's spacer's sides. I aligned the plate nuts so they were out a bit and tight (if left loose they are hard to manage). I then took a little dish soap and lubed the C's shifter and pulled the C's lower boot down over it until it passed the thick part. I rinsed off the soap and dried the assembly. It seemed better to do it this way. This boot is not so easy to get on and I'd rather not try to clean it off over my open tranny. I then inverted the rest of the C's boot upwards so I could see below it. Now you want to feed the shifter assembly down so when the sides of it fit into the bush socket the lower arm curves back and the shifter is not sticking toward your dash (I had the trans in neutral). Slide the C's plate nuts in until the loose ends line up with the bolt holes, make sure you can't lift the shifter assembly up at this stage, if you can then the shifter is not seated fully. Pop in the other two C's cap bolts and tighten them down. Not sure on the torque specs on this... but I tightened them with just an allen key and hand strength, then a little pull with the key and pliers. Make sure the shifting is smooth. Now flip the inverted lower boot back down and over the C's spacer. The C's spacer has a groove in it for the zip-tie. Mine was a little too big to seat into it, but I don't think it will be an issue it's pretty tight. I used a standard 11" american zip tie...Gardner Bender's...I will update with the width. Once that is done, put the lower rubber cover back over the lower boot (there are arrows to align it front to back), the lower boot needs to be pulled up and through this. Next just place the upper rubber boot over it all, then the metal dust cover trim...use a tool to align the holes to the bolt holes and replace the first four bolts you had to remove. Then place back the shifter boot and trim and screw your shifter knob back on. I turned my shift boot inside out at this step and placed a zip-tie at it's top once it's tight against the shift knob so it doesn't flap around. Pop the lower trim back in place and drive. |
| December 09, 2006 | Install of Cusco RUCA's, SPL Rear Toe Rods, SPL Subframe Spacers, and SPL Steering Rack Bushings (Energy Suspension Left and
Nismo Right). First this job would be a lot easier with two people...I did it all solo. With the install of the RUCA's and Rear Toe Rods you are going to need an alignment no matter how good you matched things up. It took me between 4-5 hours to do all of these jobs. I am an experienced wrencher, with a ton of tools. I'd make sure you have at least a full 8 hours to spend on this if you are still new to mods and don't have more than a starter toolset. I have run out of camber adjustment now lowering my car to fit my 235/40R17's...I needed RUCA's. I am 2.625" lower in front and 1.375" lower in the rear. Tools: 14mm, 16mm, 17mm, 18mm and 19mm sockets/open ended wrenches for the 17-19mm. For the Cusco RUCA's, you will need 26mm and 30mm open ended wrenches (you need both at the same time as the 30mm holds the middle, and the 26mm does the jam nuts). I used both my 3/8" and 1/2" rachets during this. A reducer or increaser socket probably won't cut it. You will need clearance and muscle for this job. Adjustable wrenches to +25mm, I am not sure the exact size, but it's time I buy larger wrenches and sockets. You could get by with channellocks if you don't mind marring the surfaces a bit. You will need torque wrenches that go to 75 ft/lbs (1/2") and 65 ft/lbs (3/8")...there is a lot of clearance issues so make sure you have extensions and compact rachets. A crayon to mark your alignment on the eccentric bolts. Probably WD-40 or other nut freeing substance and a piece of pvc or pipe to use as leverage (I am a strong guy, I move things people say I will get hurt doing so I will leave it at that...suspension bits that get torqued to only 60-80 ft/lbs seem to need a lot more torque than that to remove). A pry bar to install the subframe spacers...a large screwdriver would work. A jack and stands. Something to cut the zipties on the suspension bits. Some chassis lube for the rod ends. Two wheel chocks (2x4's or bricks). I would also recommend Simple Green or similar to clean everything off prior to starting as well as when done if you keep your undercarriage clean. I used it afterwards as I already clean my undercarriage during washes. A Factory Service Manual (FSM) for torque specs. Apply the e-brake and chock the front wheels (I used two bricks). First mark the nut/bolts closest to the middle of the car on both the RUCA's and the Toe Rods...this is your alignment. There is a front and back to these the back you can't see easily so just scrape a crayon straight down on it so you know how to stick it back in. I installed the RUCA's first...the nut/bolts on these were hard to remove. I used a length of PVC pipe and it was used a lot in this. Once you have it out, line up your new one next to it. You want to adjust it to the same length...don't just extend the rod end and don't just extend the base nut either...average it out between them. Make sure the rod end is vertically aligned when you tighten it down. When you install the bearing goes toward the inside of the body. L is Driver's side, R is Passenger. They look sort of the same flipped, but they are not. The clearance is tight on the bolt head on the eccentric. 19mm box wrench is your friend on this...not much else will fit in there. Once you get it off, install the new one's...pick the right one...L is driver's side. This is the part I wish I had a buddy...you are probably going to have to push in from the brake assembly to get the bolts to line up. I used my shoulder and contortions to make it work alone. I then did the toe rods which were also on tight, but easier to install. Every thing on the RUCA's applies to this part of the job. Once those were installed, I moved on to the subframe spacers. The Greg Dupree were great...it wasn't that I didn't like them. However, they increase anti-squat a bit...the SPLParts ones (or any 8 piece set) keep the stock anti-squat. The SPLParts ones take more work to install...I installed the Greg Dupree's in less than half the time and no prybar. First put a jack under the rearend about an inch below. Now undo both rear nuts of the subframe. Then focus on a side. Remove the front subframe 'plate'. It's a couple of 14mm bolts and the 16mm nut holding on the bushing. The lower one is easy...the top may need prying...be careful what you are prying against. Once you get them in move to the rear and repeat. Reinstall the lower plates on both...you may need a jack for the front plate...I used it on both sides to be able to get the nuts back on. Then I Simple Greened it all and scrubbed it a bit....rinsed it all off and put my wheels back on. Did an inital tightening of the lugs...lowered the car; torqued the lug nuts to final specs. I installed the steering rack bushings doing it one side at a time, starting at the passenger side (the round bushing; the Nismo one. You can use the Energy Suspension ones for a Z32; like the driver's side one, but it has to be cut whereas the driver's side doesn't...it may be easy, but I elected plug and play). I also didn't remove the wheels. It would be much easier to get the whole front of the car in the air and remove both wheels. If you can get the car high enough the wheels could stay on. Prior to removing the bushings make sure you see where the 'split' in each is. This is a tricky job doing it the way I did. There isn't alot of room. The passenger side goes on easy, but the driver's side is like sideways "D". First remove all four bolts, the front two are hidden in a large oval cavity on the front subframe. The nuts are welded to the brackets so you don't have to hold them [this added some time to the job as I thought they were real nuts]. Remove both upper brackets and remember their alignment (mostly for the driver side). The passenger side should be easy to R&R. You have to push up on the rack a bit. Once it's in and the ends are almost touching each other like the split was before you removed them. Now the driver's side is harder...harder to see, harder to get your hands in. I had to use a little soap to get the bushing to slide around the rack. Once it's in reinstall the upper bracket and tighten the two bolts evenly. Then do the same for the passenger side. While the car is up, it's a good time to clean the underside and check for leaks. Like with any modifications, when you drive for the first time test braking first...if that passes do it hard. Then do a quick acceleration. Then some light turns and heavier ones. If anything feels 'loose' recheck all torques. This was part of my Christmas present to myself...once alignment is done on Monday I will get to see the improvement. |
| December 11, 2006 | Alignment/Balance and Coolant Flush at Palm Beach Performance at the Palm Beach
Auto Mall. First and foremost I recommend these guys wholeheartedly. They know all the Z-cars and all the S-cars (the 240sx) blindfolded. I
rarely take my car in for work as I like turning my own wrenches...and when I do take it in, I don't want the mechanic asking me how to adjust something
on my car. Here they know it all. They are also driver's of Nissan Z's and 240SX's. They charge EXTREMELY competitive pricing. Great service and deal.
Most of this is uneventful, I will post the alignment specs before and after I lowered the car and did my rear suspension arms. Before: Front: Camber: -2.3/-2.4º Caster: 8.1/7.8º Toe: 0.64/0.60º Rear: Camber: -3.3/-3.3º (I did pretty good getting it back to out of alignment when lowered specs :)) Toe: 0.12/0.21º After: Front: Camber: -1.9/-2.0º Caster: 7.0/7.5º Toe: 0.00/0.00º Rear: Camber: -1.2/-1.2º Toe: 0.26/0.25º |
| April 19, 2007; | Alternator died. Normally an alternator is something I would just do myself. Most of the time I have had fair warning
that it was dying, this time I had about 1 day warning and the next day I had to get it fixed. At first my symptoms was the car not taking the gas after 3500-4000 rpms. I thought I threw a limp code or something came off. By the time I could look at it the car didn't start right up...I had to crank it a few times. I figured I would order an alternator or battery the next day once I found out which failed. That next morning the car would not start at all. I had to push start it and even then if I let it fall below 1500-2000 rpms it would stall. I limped to Palm Beach Performance and although they were fair on the labor, Palm Beach Nissan charges the core ON TOP of the MSRP. Any other dealership quoted me about $100 less...online I could have saved about $200. When all was said and done I was out $430.55. |
| July 14, 2007 | NGK 6953 V-Power Spark Plugs again...it's only been 20k miles, but I was replacing another car's at the same time. |
| November 30, 2007 | One of my headlights burned out, so I decided to upgrade my lighting. After checking out
www.DanielSternLighting.com, I decided to go with Narva lights from
Store.CandlePower.com. I picked up the Narva RangePower+50 H1's for low beams, Narva
RangePower+50 H3's for my fogs (I almost picked the Selective Yellows they sold, I may buy them to try out), and instead of
the stock 9005 for the high beams, I chose the HIR1 9011 bulbs which are much brighter. The modification is simple and I did it
in less than 5 seconds per bulb. There is a write up at
http://shnu.us/HIR%20Trimming%20Stock.htm. To summarize what you need to do:
On a 9005 high beam, the top tab occupies a space roughly from 11:00 to 12:00. On an HIR 9011 high beam, the tab is the same depth as the
9005 but runs from 11:00 to 1:00. All that's needed to trim it is to remove the portion from 12:00 to 1:00. I used my dremel cutoff
wheel and it fit perfect. The passenger side low beam was the hardest. Removing the battery would make the job easier. I did not and was able to install them. I also purchased new 796 reverse lights which are MUCH MUCH better, 2886X bulbs for my side markers, trunk and rear marker lights. I went with their 3496 for my brake lights and 3497 for my rear turn signals. I had to stick with my stock ambers for the front turn signals for legality. The lighting seems WAY better then the PIAA Xtreme Whites I had in Hella enclosures on my Saturn and miles away from the stock lighting. |
| February 8, 2008 | Back to Harvey's Brake and Muffler to have some Goodyear Eagle F1 Asymmetric 235/40ZR17's from Tire Rack put on. The
previous tires, Goodyear Eagle F1 GS-D3's were a great tire. I was able to get a little over 12,000 miles on them and if I had rotated them
properly probably would have gone to 15,000 or more. Unlike some of the other tires I have had, the GS-D3's kept performing just like when
they were new throughout their life. If noise or harshness increased, I really didn't notice. Now that I have a place to work on my car whenever I want I will keep up with the tire rotations. The Asymmetrics can be rotated like normal tires. They are directional, but that only applies to what side of the tire faces out. The Asymmetric are the next level to the GS-D3's adding more dry grip as well as excellent wet performance. They are quiet, ride well and have good handling characteristics. I haven't pushed them to the limits yet as I only have about 200 miles on them. However; so far I have no complaints. One thing people have brought up and I can agree, the tread pattern looks like a normal passenger tire and not as aggressive as the GS-D3. Regardless, the tire performs and if that change-over was needed to do conventional tire rotations...it's a good trade off. |
| February 15, 2008 | Now that I have a place to work I finally did a full detail on my car...I have only washed and quick waxed it since
I bought it. The paint was still in excellent shape fortunately. It had been about 5 years since I bought supplies, so I had to reload my inventory. I picked up some Clay Magic Detailing clay from www.DetailNet.com. They had great pricing on the clay I like best (detailplus.com also has/had great clay...they changed their formula so I am not sure how the new stuff performs they have the best pricing on it at $9.95 for two 4oz bars in quantities of 5 or more). As a bonus they through in some car air fresheners called wonder wafers. They are small, about an inch square; but put out a surprising amount of fragrance. I didn't need these in my car, but I did hang the two 'Black Royale' they sent me in my workshop. The main site is www.wonderwafers.com, but they are a bit higher priced if you order direct. Stick with Detailnet.com for them. I needed a new buffer since I toasted my 10" Craftsman doing my dad's boat...I picked up a Porter Cable 7424 with the 6" counterweight, and a 6" foam pad from www.CoastalTool.com for an incredibly low price. If you need everything you may find better combo deals out there though. Then I needed various 'stuff' to do the detail, www.AutoNet.net seemed to have everything I needed and offered free shipping within Florida. Some have critiqued them that they are a bit more expensive than some shops, but with the free shipping they were the cheapest for me. On top of that, their customer service is EXCELLENT. I had manufacturing defect from a Lake Country product (rare, they make excellent items)...I was shipped out a replacement that same day. I also made the wrong choice on going with www.EdgePad.com's Wave setup. They are probably excellent for a rotary buffer, but two of mine had barely any foam near the center and I just knew if I ever made an error, I may set myself up for paint damage. Using a DA buffer you tend to be not as attentive as with a rotary. Autogeek swapped my Wave pads for the standard pads no problem. I also ordered from them several types of microfiber cloths, 303 Aerospace Cleaner, 303 Aerospace Protectant, 303 Aerospace Fabric Guard, a few detailing brushes, a Forever Black Trim Dye kit, Meguiars Ultimate Quick Detail, Meguiars Plastx, Meguairs #10 Plastic Polish, Meguiars #21 Sealant, a couple Porter Cable upholstery brushes (the Aqua and white ones), a few spray bottles, Stoner Invisible Glass, the 6 pack of Edge pads (Yellow, Orange, Green, Blue, White, and Red), another 2 of the white and red pads (white is great for everything and red is perfect for putting on the wax/sealant and removing it as well), a Paintwork Clay pad, a Glass Polishing kit, and a fire hose nozzle. www.AutoDetailingSolutions.com has the best prices on Meguiar's products (outside of ordering $75 or more from AutoGeek and picking up free shipping). I picked up a bunch of Meguiars products from them. All in all out of the Meguiar's line up I now have their #83 Dual Action Cleaner Polish, #80 Speed Glaze, #9 Swirl Remover, #5 New Car Glaze, #7 Show Car Glaze, #21 Synthetic Sealant 2.0, #26 High Tech Yellow Wax, Gold Class Wax, Hyper Wash, Plastx, #10 Plastic Polish, Ultimate Quick Detailer, Scratch-X, Endurance High Gloss Tire Gel, and Endurance Natural Shine Tire Gel. I have been using their products since 1988. I used to use their Natural Shine interior spray, but I think the 303 Aerospace Protectant is better and more natural looking. I also picked up a 'grit guard' and a 5 gallon bucket along with two microfiber mits. I also purchased some DP Carpet and Upholstery Cleaner. I also use Folex for cleaning which is excellent. I already had two absorbers for drying. So I went through all of the above over a few days and my car came out immaculate. |
| March 2, 2008 | Installed Nismo Motor and Trans mounts. I followed Import Nut's write up. I had to jack from the oil pan for the passenger side mount as I could not use any amount of 'shims' to get to the alternator bracket securely. Jacking from the oil pan is not a good idea for the whole car, but to just lift the engine it's not too bad if you use wood to spread out the load. I used about a 8 inch piece of 2x4. If you have a strut tower bar you want to put something under your rotors and then remove the nuts holding it or you will not get enough clearance for the engine to to clear the mounts. The passenger side was by far the hardest part. I had to remove the bolt holding the piece that attaches to the intake manifold and runs to the wiper motor. There was still hardly any room to move...I used a wrench vs a socket to remove the mount to engine nut. The nut that held the wiring was easy with a socket once you got the plastic wire holder off the stud. It would not pull off easily. I ended up using plastic trim crowbar to get it. Torqueing the top nuts was impossible as there was no room for a torque wrench. The driver's side was basic...I used a 2x4 like Import Nut said along the A/C bracket. The trans mount I thought would be the worst, but in reality it was the easiest. Most of the nuts are very low torqued. This would be 100 times better with a lift or a larger jack...my biggest problem in this was your jack not only needs to be able to get you car up to a decent level, but also beyond that for clearance of the mounts. It took a few hours to do this mostly trying to figure out the right way to do the passenger mount. I probably could cut 1-2 hours off this looking back now. [strong]Driving Impressions:[/strong] Excellent results. My stock mounts looked fine to me outside the car...so I doubt they were 'bad'. I didn't notice anymore interior resonance or vibration (my car is not stock though so YMMV, see above for the rest of the mods). In reality, it calmed down a 4k rpm vibration I was getting (it's minor, but noticable). Prior to the install my transmission moved with the engine and especially over speed bumps a bit...now it's pretty solid. The car feels noticably tighter. I am happy with the results. I ordered these from www.MyNismo.com aka PerformanceNissanParts.com...their pricing was great. |
| April 12, 2008 | Installed OBX Header, 248 Exhaust cam for intake, JWT cam gears, TRGCoating.com Valve Cover in Wrinkle Black, 5Zigen 80mm ProRacer Catback, and Catco 3" cat. Lots of work this day and some drama. First did the cam and the JWT gears...pretty uneventful. I was hoping to try 240/248, but the 240 degree cam I received was damaged. I had painted my cover with paint prior...I prepped the surface well, but it began flaking off. The TRGCoating.com cover I got back was a work of art. Perfect and it was cheap to get! I went with black this time...red was a little loud for my tastes. I highly recommend there service. I bought a new FelPro gasket even though my old one was probably fine. I removed the exhaust manifold shield and PB Blasted the manifold nuts. I then went underneath the car and did the exhaust swamp. The 5Zigen exhaust is a beast...80mm piping. Surprisingly it's still much lighter than the stock system. Fit was perfect. I used Nismo exhaust hangers + 1 stock (they were sold in a 3 piece kit, I assumed that there were only 3 hangers...there are 4.). Did a Catco 3" cat at the same time. Went back up top to do the header...the very first nut sheared right off loosening it :(. I was hoping there would be some meat to grab the stud to extract it. Fortunately, the rest of the nuts came off fine, unfortunately I had to extract the stud as it was below the head surface...go figure the extractor broke (my fault, I didn't centerpunch it first)...I had to drill it out for a 12mm stud...I went through the water jacket but using Hi Temp silicone has proven a leak free fitting (as of 1 year and 11 months still good, I haven't tried to loosen it again though...). Anyway, once that was resolved the header install offered more issues. First, there was a steering link bind on the factory built in 'nut' (solved with first grinding it down a bit as it's built overkill, then heating the header and clearencing it slightly. The scary part was sitting neutral it was fine...if I bounced the car it would hit at almost full turn practically locked. I am glad I knew to check for this prior to driving it. It also touched the body right where it curled under the firewall (solved with a mallet and one good whack)...the final problem was that the header uses a slotted flange...the slots allowed for an exhaust leak (solved by taking it to Custom Exhaust of Lake Worth for a new 3" flange). I wanted the DC Sports header (or a HotShot which was discontinued), but they were going through their corporate change at the time and there were none available. The exhaust is pretty loud under the gun, sounds really good idling though. I knew this going in and once I do a turbo it will be perfect. It's got a great sound though. Once everything was done my power was actually down. I went for a few dynos and it was bad. I tried +2.5 advance on the 248 cam, then -2.5...I was way down on power (less than stock). Turns out either the 248 I was sold was over worn or simply not a 248 cam...I never dynoed again once I swapped back my 232 cam, but it was definitely more responsive and powerful. I wanted to try 0 degrees on the cam I bought, but it'd have been too much work and not solve anything. I am pretty sure it wasn't a 232 cam, but may have been another Nissan issue, or simply worn out...even though it lashed properly, the lobes at full lift may have been tired. During all this I had tried to resolve the power issue by trying other things: I did get a P0304 code thrown right after (ignition)...went with a new set of NGK 6953's and Accel 7940R wires...code cleared, but power was still down. I took a shot at replacing the injectors...DeatschWerks is great and very good on pricing...I was still down on power... I then went with a Wix 1995 300ZX fuel filter...still down. I picked up a new Knock Sensor after testing and seeing my timing was retarding wierdly...this improved things, but the power was still down over stock. I picked up this knock sensor from eBay. Much much cheaper than the factory and I got an authentic Nissan sensor. I also did the Fuel Pump Relay mod...I had an extra Bosch relay and already had a ground and +12 distribution block in my trunk. Made for an easy install. I mounted the relay directly to the underside of the cover (you have to place it in the right spot so it all bolts down). A simple nut and bolt keeps it attached. When I go turbo this relay is going to be needed anyway...I was hoping it would solve my issues now though. It didn't. |
| July 3, 2008 | Alignment time again.... If you live close to the Palm Beach County area, Ernie Bello Motorsports should do your alignments...reasonably priced and they don't rush the car. I used to use Weber, but on other cars I was not getting what I wanted. I'd get an aligned car, but not to my specs. With Ernie Bello, it's dead on. Not averaged out, not adjusted 'close'...you get it the way you want it. One day I want to take my car in for a full corner loaded alignment. I went with -2.5º camber/0 toe/7.4º caster up front and -1.5º camber out back. It's twitchy on the highway...I don't mind, but if you are just looking to cruise with your car don't go with these specs. |
| September 15, 2008 | New battery My red top died, I went with a Yellow top this time. I was in an accident and the battery was damaged. It didn't just fail on it's own. I ran it down a few times in it's life, either leaving lights on/doors open or other things. Optima makes a great battery...Costco is great for pricing or online. |
| February 12, 2009 | Reseal quarter glass I had a very minor leak in my passenger side quarter glass for a long time, after my accident it was pretty bad. At the same time I noticed the driver's side also was letting a little water through it. Hired a pro for this job...done. No more leaks. |
| November 24, 2009 (estimated) | Replace fan blower motor A/C fan would intermittedly turn off or not start at all. Banging on the air handler usually fixed it. I purchased a new resistor and fan blower (I took it apart first and the motor was definitely shot, the shaft had major play in it). Purchased a new one from AutoZone...beware you will have to do some wiring magic as the new one has no ends on it. I was up for the job, but many probably would be expecting plug and play...it was much less in price than the factory piece. The soldering job with the old connector took 15mins. |
| December 2009 | Broken outer tie rod end More drama a month later...I was at a Dog Park making a U-Turn when something popped. Turns out that it was my outer tie rod end (the Kazama's I bought from SPLParts). Not any fault of them though as it turns out my inner tie rod was bent as well as the boot. Looks like someone jacked the car up from it during my accident estimates. I am just glad I wasn't on the highway doing 90+. Called SPLParts the next day to order up some new goodies. Kuah is great, he understands when a customer has a problem and goes the extra distance. Told me I could upgrade to the newer Version 5 ends and recommended going Z32 inner tie rods. Saved me a lot of money from what I was expecting...even got it out over-night the same day. I am glad they will let a customer do this and not rape them on shipping it. I always look at SPLParts for anything I need first. Back to Ernie Bello for another great alignment! |
| March 14,2010 | Replace door seals, window seals, wiper moldings Getting water on my passenger side behind the seat...I had known I needed new seals for a while being the car is beyond a decade old. Turns out most of the problem was due to when I had my rear quarter glass redone they sealed the roof drain holes. I fixed that, but was still getting some water there. I am hoping I solved it now. Did a full wash on the car and the floor is dry. Only on the direct pinpoint spray on my hose nozzle did the new seals allow water past...much much better. Before even the spray would have little leaks if I put it directly on the glass/body edge. Have to hope this solves it. |
| March 18, 2010 | Replace Clutch, Flywheel, Rear Main Seal, SPL Clutch Pivot Ball and Oil Change. Finally stopped by Ter-Tech located here in my area. Harri is definitely a great mechanic. I usually like to do my own work, but I am recovering from a major arm injury and dropping a tranny without a lift is a potential disaster. My clutch has been shot a while. Opening this mess up showed I had absolutely no clutch left. My throw out bearing was messed up, my flywheel would take a miracle to service for it's last go at life. It's amazing the car shifted at all. I am glad I picked up a Fidanza flywheel from UltraRev, Ray is a great guy. You call them you get him. This is rare in the car part world. I had an issue develop and had to get him on the phone, he had me in contact with Fidanza instantly. When they couldn't help me overcome this, he was willing to go that extra mile and get another shipped out the same day for overnight delivery (I paid for it, but most 'vendors' will tell you there is a 'lead time' to ship)... I can't comment on the flywheel yet. Have to break in my clutch. Driving so far is normal save how light my clutch pedal feels (due to all the worn out parts not the lightened flywheel) can't wait to open it up. Put in an SPLParts clutch pivot ball, Kuah is also great...I always...absolutely always check his site first. While probably not needed for this clutch, I wanted to make sure I had any parts on hand for this long neglected install. About $20...no brainer. Harri got it all sorted out. Great shop. Suggested doing my real main seal and did my oil change needed. He ia not a typical mechanic...looks at everything even outside what he is working on. Gives the owner great recommendations. Just what I want when I bring my car in for service. Most mechanics will spend hours installing one part and ignoring another right in front of them that's bad. Now I just have to break it all in...500 miles of grandma driving :( |
| April 9, 2010 | Clutch Update. Back to Harvey's Brake and Muffler to have another set of Goodyear Eagle F1 Asymmetric 235/40ZR17's put on. First the clutch...so different now. Shifts are nice and smooth...I can't say the lightened flywheel has made it any harder to drive. Third gear still grinds a little sometimes (still goes into gear fine, just a little notchy maybe...usually the first shift of the drive and I am not sure if it's just me not pushing the clutch down enough). My second set of Asymmetrics. I really like this tire a lot. Excellent in the rain, much better than even my Goodyear GS-D3's and if they did give up anything in the dry I can't tell. About the same mileage and I may have rotated them 2 times total....I ended up a little over 14,000 miles this time. I was going to try the Michelin Pilot Sport 2's this time, but they were about $150 more for all four at the time I was looking... If you are in the Palm Beach County area, give Harvey's a shout. It's a third generation shop now and I have been going since I was in high school. They do a good job always. |
|
|
|
| Future Plans: |
My next plans are: LSx swap. More than likely a 5.3 liter as they are much cheaper than the LS1/LS2's and still make insane power for what I want to do. 3.64 Q45 gear swap. 4.08 is a bit low for the power and the T56 transmission. |